How to Use Asana Effectively - Step By Step Guide For Beginners
Learn how to use Asana to successfully manage business and personal assignments. Our thorough guide covers everything from task creation to team collaboration.
Suggested:
One of the best but easiest methods to remove humming noise or wind noise in Adobe Premiere Pro is to use the High Pass Filter. Welcome to another blog post on the tutorial guide on how to reduce humming noise in Premiere Pro without any complicated setup. In this post, I will be sharing several methods on how to achieve the complete removal of noise in Premiere Pro.
This post will be well-detailed and I will put the necessary shots to guide you on the necessary part, so don't miss any part of this tutorial guide.
We have various methods on how to denoise your Premiere Pro project and have a nice audio output after exporting to production.
So, what are we waiting for? Let's get started.
Table of contents [Show]
High Pass Filter is another great way to remove noise from Adobe Premiere Pro, it doesn't require you to do much or do any complicated settings. Now navigate to your Premiere Pro application and I guess you must have had it installed on your PC, click on Effect Workspace or Effect Window then search for High Pass Filter, then you would need to drop it in your project clip then turn up the Cutoff Settings, instantly the noise disappears but makes sure it is at 10 on the minimum.
This method is very effective with thin-out vocals.


Adobe Premiere Pro is such a great application that gives you wide options to get things done, the DeNoise tool helps you reduce or remove wind and humming sounds to give you great media quality.
Now, "Open" your Premiere Pro application, go to the Audio Effects tab or folder, and search and type "denoise"

Just like High Pass Filter you can drop it in your audio clip and save it
Then you have to click the edit button to change and reduce the amount of denoise effect that would be applied to your project. Boom a dialog box would pop up, with this, you can save your changes. Note: there are lots of preset options that would help you achieve this faster but it is up to you to adjust your preferred settings.

It's better to start manipulating the "Processing Focus" at the bottom of the dialog little by little so that you don't remove the whole sound from the main audio itself.
If you are good with the result, you can click "OK" to save changes.
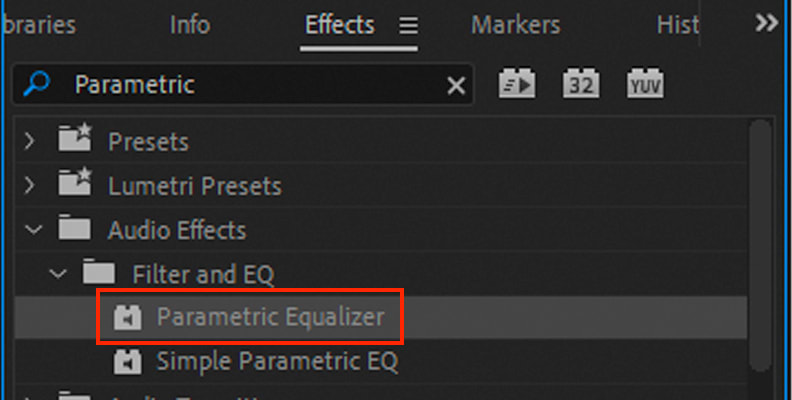
Launch your project in Premiere Pro, click on Effect panel click on the Filter and EQ then pick the Parametric Equalizer.
There are two best options to choose from in this case, they are "Low Cut Frequency" and "High Cut Frequency" You just need to adjust them so you can see the effect on your audio.
Adjust EQ and gain controls to modify the way this option affects your audio.

You need to practice to be able to adjust and remove wind noise in Premiere Pro. These methods are effective in removing wind noise all you need to do is observe your audio to get it right.
Wind noise can be attained when recording in an open or noisy environment without soundproofing, it is advisable to check your environment to avoid any kind of external noise in your recording system. With these listed options above, you can choose which fits well for you to use.


![How to Track a Scammer on WhatsApp [5 Easy Steps]](http://res.cloudinary.com/dycxivucc/image/upload/v1/general/track-scammers-on-whatsapp-150x150.jpeg)